
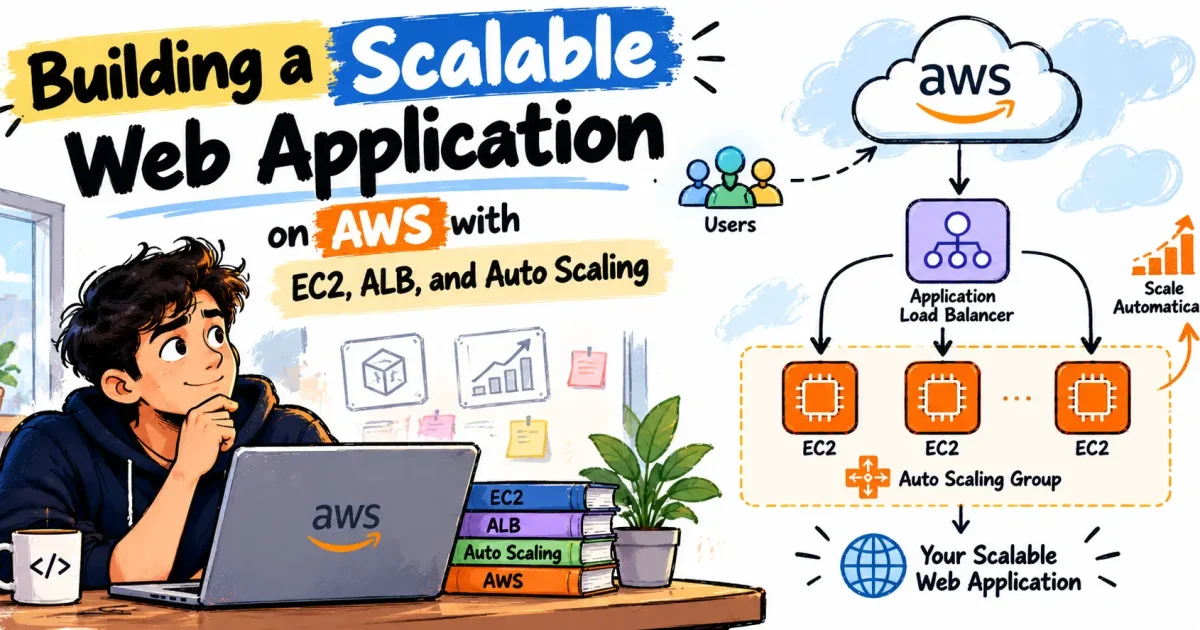
A single EC2 instance is a single point of failure. If that instance goes down, the application goes down with it, and if traffic spikes, there is no way to absorb the extra load. The standard AWS pattern for fixing both problems is to put an Application Load Balancer (ALB) in front of a fleet of EC2 instances and let an Auto Scaling Group (ASG) manage how many instances exist at any given time. This guide walks through building that architecture from a blank VPC to a working, load-balanced, auto-scaling web application, using Amazon Linux 2023, Apache, and a CPU-based target tracking scaling policy.
What You Will Build
By the end of this walkthrough, you will have a custom VPC with two public subnets in different Availability Zones, an internet-facing Application Load Balancer, a Launch Template built from a custom AMI, and an Auto Scaling Group that keeps between 2 and 4 Apache web servers running behind the load balancer. A target tracking scaling policy will add or remove instances automatically based on average CPU utilization.
Internet
   |
   v
Application Load Balancer (ALB)
   |
   +-------------------+
   |                    |
   v                    v
EC2 Instance #1     EC2 Instance #2
   Apache               Apache
   |                    |
   +---------+----------+
             |
        Target Group
             |
       Auto Scaling Group
             |
        Launch Template
             |
        CloudWatch
       Scaling Metrics
Prerequisites
- An AWS account with permissions to create VPC, EC2, ELB, and Auto Scaling resources
- Basic familiarity with the AWS Management Console
- An SSH key pair for connecting to EC2 instances
- No prior networking or load balancing experience required — each step is explained as it happens
Lab Configuration Reference
These are the exact values used throughout this build. Keeping them consistent matters because the ALB, Auto Scaling Group, and security groups all reference each other by name.
| Parameter | Value |
|---|---|
| AWS Region | ap-south-1 (Mumbai) |
| VPC CIDR | 10.0.0.0/16 |
| Public Subnet 1 | 10.0.1.0/24, ap-south-1a |
| Public Subnet 2 | 10.0.2.0/24, ap-south-1b |
| EC2 instance type | t3.micro |
| Operating system | Amazon Linux 2023 |
| Web server | Apache (httpd) |
| ALB listener | HTTP : 80 |
| ASG minimum / desired / maximum | 2 / 2 / 4 |
| Scaling policy | Target tracking, average CPU utilization, target 50% |
Step 1: Create the VPC and Networking Layer
Every resource in this build lives inside a dedicated VPC rather than the account’s default network. This keeps the lab isolated and makes the routing explicit.
- In the AWS Console, go to VPC → Your VPCs → Create VPC and choose VPC only.
- Name it
DevOps-Web-VPCand set the IPv4 CIDR to10.0.0.0/16. - Create the VPC.
An internet-facing VPC needs an Internet Gateway attached to it, otherwise nothing inside the VPC can reach or be reached from the public internet.
- Go to VPC → Internet Gateways → Create internet gateway and name it
DevOps-Web-IGW. - After creation, select Actions → Attach to VPC and attach it to
DevOps-Web-VPC.
The Auto Scaling Group needs at least two subnets in two Availability Zones so instances can survive the loss of a single AZ. Create two public subnets:
Web-Public-Subnet-1—10.0.1.0/24inap-south-1aWeb-Public-Subnet-2—10.0.2.0/24inap-south-1b
A subnet is only “public” if its route table sends internet-bound traffic to the Internet Gateway. Create a route table, add a 0.0.0.0/0 route pointing at DevOps-Web-IGW, and associate both subnets with it.
Step 2: Configure Security Groups
Two security groups keep the traffic boundaries explicit: one for the load balancer and one for the EC2 instances.
- Web-ALB-SG — allows inbound HTTP (port 80) from
0.0.0.0/0. Add HTTPS (443) if the lab is extended with TLS later. - Web-EC2-SG — allows inbound SSH (port 22) from your own IP for administration, and inbound HTTP (port 80). For a tighter design, set the HTTP rule’s source to
Web-ALB-SGinstead of0.0.0.0/0, so instances only accept web traffic that has already passed through the load balancer.
Step 3: Launch and Configure the Base EC2 Instance
Before anything can be automated, one instance has to be configured by hand. That instance becomes the template for every server the Auto Scaling Group launches later.
- Go to EC2 → Instances → Launch Instance and name it
WebServer-Base. - Choose the Amazon Linux 2023 AMI and a t3.micro instance type.
- Select or create an SSH key pair.
- Set the network to
DevOps-Web-VPC, subnet toWeb-Public-Subnet-1, and enable auto-assign public IP. - Attach the
Web-EC2-SGsecurity group and launch the instance.
Connect to the instance using EC2 Instance Connect and install Apache:
sudo dnf update -y
sudo dnf install httpd -y
sudo systemctl start httpd
sudo systemctl enable httpd
sudo systemctl status httpd
systemctl enable matters as much as start here — it makes sure Apache comes back up automatically if the instance reboots, which is exactly what happens every time the Auto Scaling Group launches a fresh copy of this server later.
Replace the default Apache page with a simple static page so it is obvious, later, which instance is serving a given request:
cd /var/www/html
sudo rm -f index.html
sudo nano index.html
<!DOCTYPE html>
<html>
<head>
<title>AWS Auto Scaling Demo</title>
<style>
body { font-family: Arial, sans-serif; text-align: center; padding-top: 100px; background: #f4f7fb; }
.container { background: white; padding: 50px; margin: auto; width: 60%; border-radius: 15px; box-shadow: 0 5px 20px rgba(0,0,0,0.1); }
h1 { color: #232f3e; }
p { font-size: 20px; }
</style>
</head>
<body>
<div class="container">
<h1>AWS Auto Scaling Web Application</h1>
<p>Application Load Balancer is working!</p>
<p>EC2 Instance is serving this request.</p>
<p>DevOps AWS Lab</p>
</div>
</body>
</html>Test it locally with curl http://localhost, then confirm it in a browser using the instance’s public IPv4 address.
Step 4: Create an AMI and Launch Template
Auto Scaling doesn’t configure servers — it launches copies of an image. Everything installed and configured on WebServer-Base needs to be captured into an Amazon Machine Image (AMI) so new instances come up already running Apache with the site deployed.
- Select
WebServer-Baseand choose Actions → Image and templates → Create image. - Name it
DevOps-WebServer-AMIand create it. - Wait for the AMI status to become Available before continuing.
The Launch Template is the configuration Auto Scaling actually reads when it decides to add a new instance — AMI, instance type, key pair, and security group all live here in one reusable definition.
- Go to EC2 → Launch Templates → Create launch template.
- Name it
DevOps-Web-LaunchTemplate. - Select the
DevOps-WebServer-AMI, instance type t3.micro, the SSH key pair, and theWeb-EC2-SGsecurity group. - Create the template.
Step 5: Create the Target Group and Application Load Balancer
A Target Group is the object the load balancer actually routes to — it holds the list of instances and the health check that decides whether each one is allowed to receive traffic.
- Go to EC2 → Target Groups → Create target group, target type Instances.
- Name it
DevOps-Web-TG, protocol HTTP, port 80, inDevOps-Web-VPC. - Set the health check protocol to HTTP and the health check path to
/. - Create the target group without manually registering instances — the Auto Scaling Group will register and deregister them automatically as it scales.
- Go to EC2 → Load Balancers → Create Load Balancer and choose Application Load Balancer.
- Name it
DevOps-Web-ALB, scheme Internet-facing, IP address type IPv4. - Add an HTTP : 80 listener, select
DevOps-Web-VPC, and select bothWeb-Public-Subnet-1andWeb-Public-Subnet-2— the ALB needs at least two AZs to be created. - Attach the
Web-ALB-SGsecurity group. - Set the HTTP listener’s default action to forward to
DevOps-Web-TG, then create the load balancer.
Step 6: Create the Auto Scaling Group
This is the piece that ties everything together: it uses the Launch Template to know what an instance should look like, the Target Group to know where to register new instances, and a scaling policy to know when to add or remove them.
- Go to EC2 → Auto Scaling Groups → Create Auto Scaling group, name it
DevOps-Web-ASG. - Select
DevOps-Web-LaunchTemplate, chooseDevOps-Web-VPC, and select both public subnets. - Attach the existing
DevOps-Web-TGtarget group and enable ELB health checks — this makes the ASG treat a failed ALB health check the same as an unhealthy instance and replace it. - Set desired capacity to 2, minimum to 2, and maximum to 4.
- Add a target tracking scaling policy on average CPU utilization with a target value of 50%, then create the group.
Step 7: Test the Application Through the Load Balancer
Go to EC2 → Load Balancers → DevOps-Web-ALB and copy its DNS name. Opening that address in a browser should load the same static page, but now it is being served through the load balancer rather than any single instance’s public IP.
Refreshing the page repeatedly will occasionally show a different instance responding, since the ALB distributes requests across every healthy target in the group. In this lab both instances serve an identical page, but in a real deployment this is the point where you would notice, for example, one instance running an older application version.
How Auto Scaling Responds to Load
With minimum 2, desired 2, and maximum 4, the group is free to move capacity anywhere in that range as CloudWatch metrics change. The two directions work as mirror images of each other.
Scale-Out
Traffic increases
  -> Application workload increases
  -> EC2 CPU utilization increases
  -> CloudWatch observes the metric
  -> Scaling policy evaluates the target
  -> Auto Scaling Group launches another EC2 instance
  -> New instance passes health checks
  -> Instance is registered with the Target Group
  -> ALB begins sending traffic to the healthy instance
Scale-In
Traffic decreases
  -> Application workload decreases
  -> CPU utilization decreases
  -> CloudWatch observes the metric
  -> Scaling policy evaluates the target
  -> Auto Scaling Group can terminate an unnecessary instance
  -> Target Group removes the instance
  -> ALB sends traffic to remaining healthy instances
Scaling is never instantaneous. AWS has to evaluate the CloudWatch metric against the policy, launch or terminate the instance, and — on scale-out — wait for the new instance to pass its health checks before the ALB will send it traffic. Expect this to take a few minutes rather than seconds.
Generating a Scale-Out Event for Testing
To see scaling happen instead of just reading about it, generate sustained CPU load on one of the running instances with stress-ng:
sudo dnf install stress-ng -y
stress-ng --cpu 2 --timeout 300s
Watch the Auto Scaling Group’s Activity tab and the target group’s CloudWatch metrics — healthy host count, target response time, and request count will all move once a new instance registers.
Common Mistakes
- Forgetting to enable “auto-enable” on
systemctl enable httpd. If Apache isn’t set to start on boot, every new instance the Auto Scaling Group launches will fail its target group health check even though the instance itself is running fine. - Building the Launch Template from a live instance instead of a clean AMI. Skipping the AMI step and pointing the Launch Template at the running
WebServer-Baseinstance directly isn’t possible — the AMI capture is what makes the configuration reproducible for new instances. - Registering instances into the target group by hand. If the Auto Scaling Group doesn’t own the registration, it can’t cleanly deregister instances during scale-in, which leaves stale or terminated instances listed as targets.
- Leaving the EC2 security group open to
0.0.0.0/0on port 80. Once the ALB is in place, application servers should only need to accept HTTP traffic that has already passed throughWeb-ALB-SG, not directly from the internet. - Single-subnet deployments. An ALB requires subnets in at least two Availability Zones; placing both EC2 instances in one AZ also defeats the availability benefit Auto Scaling is meant to provide.
Production Considerations
The design in this walkthrough puts EC2 instances directly in public subnets, which is fine for a lab but not ideal for production. A stronger design keeps the internet-facing ALB in public subnets while moving the application instances into private subnets with no direct route to the internet. Outbound internet access for patching still works through a NAT Gateway, but nothing on the internet can reach the application servers directly — only the ALB security group is allowed to send them traffic.
Internet
   |
   v
Internet-facing ALB
   |
   +--------------------+
   |                     |
Private Subnet       Private Subnet
   |                     |
  EC2                   EC2
   |                     |
   +---------+-----------+
             |
        NAT Gateway
Beyond the network layout, a production deployment would typically add HTTPS termination on the ALB, CloudWatch alarms for the target group’s unhealthy host count, and a CI/CD pipeline that builds a new AMI and rolls it out through an instance refresh rather than editing servers by hand.
Mental Model
The whole architecture reduces to one chain: the Launch Template defines what an instance is, the Auto Scaling Group decides how many should exist, the Target Group tracks which ones are currently healthy, and the Application Load Balancer is the only thing a client ever actually talks to. Nothing about the client-facing address changes as instances are added, removed, or replaced underneath it.
Conclusion
This build takes a static Apache site from a single EC2 instance to a self-healing, load-balanced, auto-scaling deployment using nothing beyond core AWS building blocks: a custom VPC, an AMI, a Launch Template, a Target Group, an Application Load Balancer, and an Auto Scaling Group with a CPU-based target tracking policy. The same pattern — bake configuration into an AMI, template it, and let Auto Scaling manage capacity behind a load balancer — scales directly to real applications, with the private-subnet variant covered above being the natural next step toward a production-ready setup.
Frequently Asked Questions
Why does the Auto Scaling Group need two subnets in different Availability Zones?
An Application Load Balancer requires subnets in at least two AZs to be created at all, and spreading EC2 instances across AZs means the loss of one data center doesn’t take the whole application down.
Why use ELB health checks instead of the default EC2 health checks on the Auto Scaling Group?
EC2 health checks only detect whether the instance itself is running. ELB health checks call the actual health check path on the application, so an instance where the OS is fine but Apache has crashed still gets marked unhealthy and replaced.
What happens if desired capacity is set above the maximum?
AWS will not accept it — desired capacity must always fall between the configured minimum and maximum, and the scaling policy can only move desired capacity within that same range.
Why is a Launch Template needed if the AMI already has everything installed?
The AMI only captures the disk image. The Launch Template is what tells the Auto Scaling Group which instance type, key pair, and security group to use when it launches a new instance from that image.